What is Matrix?

Matrix is an open standard for interoperable, decentralised, real-time communication over IP.

  • there exists an open standard in the form of the Matrix Specification
  • it’s interoperable, meaning it is designed to interoperate with other communication systems, and being an Open Standard means it’s easy to see how to interoperate with it
  • Matrix is decentralised, which means there is no central point – anyone can host their own server and have control over their data
  • it is designed to function in real-time, which means it is ideal for building systems that require immediate exchange of data, such as Instant Messaging


How does it work?

Each user connects to a single server, this is their homeserver. Users are able to participate in rooms that were created on any Matrix server since each server federates with other Matrix servers. This means you can talk to anyone on any server. It also means you can host your own server, giving you control over all of your data. Self hosting also gives you the ability to customize your server to fit your needs including giving you the ability to bridge to other chat networks (such as IRC, XMPP, Discord, Telegram, etc) or to host bots.

Each message that is sent in a room is synchronized to all of the other servers that participate in that room. If one server goes offline, everyone else in the room can continue talking. Once that server comes back online it will be sent all of the messages that it missed while it was down.

Did we mention it is secure? Your private conversations can be secured by end to end encryption so the server has no idea what you are talking about.

Here is an example where we have 3 users defined on 3 different homeservers participating to the same room (ie conversation):

The messages are only forwarded to the homeservers and the users participating to the room.

Following Dockers images are required to host your own homeserver:

  • matrixdotorg/synapse – this is the core server
  • postgres (optional) – replaces sqlite3 as database which is not performant enough in Federation configuration
  • awesometechnologies/synapse-admin (optional) – admin portal for users creation


Step-by-step installation

  1. postgres (skip this step if you want to keep sqlite3)
    1. download postgres:latest image
    2. launch the postgres image and go through following Advanced Settings
    3. create docker/postgresql and docker/postgresql/data
    4. Volumes mapping:
      •  map docker/postgresql/data folder to /var/lib/postgresql/data
    5. Networks:
      • create a network dedicated to all Matrix components: MATRIX_NETWORK
    6. Ports:
      • map 15432 (your choice as local port) to 5432 TCP (container port)
    7. Environment variables to add:
      • POSTGRES_PASSWORD: password_for_the_database
      • POSTGRES_USER: user_ID_for_the_database
      • POSTGRES_DB: name_of_the_database
      • POSTGRES_INITDB_ARGS: –encoding=’UTF8′ –lc-collate=’C’ –lc-ctype=’C’
    8. note that multiple files are created in docker/postgresql folder if container runs successfully
  1. synapse
    1. download matrixdotorg/synapse
    2. create following folders: docker/synapse
    3. open a SSH terminal and run the following command to generate configuration files (you may need root privilege “sudo su -“):
docker run -it --rm -v /volume1/docker/synapse:/data -e SYNAPSE_SERVER_NAME=your_matrix_server_name -e SYNAPSE_REPORT_STATS=yes matrixdotorg/synapse:latest generate

Note 1: make sure that there is a double hyphen character before “rm”

Note 2: note that your_matrix_server_name should be format as a domain name: for example myprivatechatserver.domain.com

    1. Edit the /volume1/docker/synapse/homeserver.yaml:
public_baseurl: https://your_matrix_server_name/
#
enable_registration: true
#
#if you want to use postgres, comment sqlite3 part and configure postgres parameters:
#database:
#   name: sqlite3
#   args:
#    database: /path/to/homeserver.db
database:
  name: psycopg2
  args:
    user: user_ID_for_the_database (defined at postgres installation)
    password: password_for_the_database (defined at postgres installation)
    host: postgresql
    database: name_of_the_database (defined at postgres installation)
    cp_min: 5
    cp_max: 10
    1. Run docker in CLI mode or use the GUI at step 6:
docker run -d --name synapse -v /volume1/docker/synapse:/data -p 18008:8008 --network MATRIX_NETWORK matrixdotorg/synapse:latest
    1. launch the matrixdotorg/synapse image and go through following Advanced Settings
    2. Volume mapping: map docker/synapse to /data
    3. Networks: choose the Matrix Network you previously created at postgres installation
    4. Ports: map 18008 (your choice as local port) to 8008 (container port)
    5.  Add users (at least one Admin one)
  1. create Admin user
    1. open details for synapse container
    2. witch to Terminal tab
    3. create a bash
    4. Type the following command follow the instructions:
cd /data

register_new_matrix_user -c homeserver.yaml http://host_server_IP_address:8008
New user localpart [root]: your_username Password: your_password Confirm password: your_password Make admin [no]: yes|no Sending registration request... Success.
    1.  you can create more users (admin or not) following the same process
    2. close the terminal
  1. create additional users with a Web interface
    1. download awesometechnologies/synapse-admin:latest
    2. launch the image with following Advanced parameters
    3. Ports: map 18009 (your choice as local port) to 80 (container port)
    4. browse to http://host_server_IP_address:18009
    5. fill in your server address: https://host_server_IP_address:18008
    6. log in with your admin account created at step 3
    7. create users – the users ID will be @user1:your_matrix_server_name

At this stage, all users created on the server should able to communicate with each other using a compatible client. One of them is Element (fka Riot.IM) which is available via a web interface (https://app.element.io/#/login) or via IOS/Android app.

Make sure you use your server IP address (https://host_server_IP_address:18008) instead of matrix.org server.

  1. Access from Internet

Let’s now make sure that the server is reachable from Internet using the your_matrix_server_name and not the host_server_IP_address. Two tasks are required:

    • ensure that the server domain name (host_server_IP_address:18008) is attached to your WAN IP address (you can use DDNS service such as dynu.com, no-ip.com, …)
    • create a SSL certificate for your server domain name (your_matrix_server_name)
    • using a Reverse Proxy rule, forward traffic sent to the public server name (https://your_matrix_server_name ) to the internal IP address (http://host_server_IP_address:18008)

Once done, you can now replace https://host_server_IP_address:18008 with https://your_matrix_server_name in the clients app and enjoy this private service chat between all users defined on your hosted server from anywhere.

Now, the next step is to make the server join the matrix.org ecosystem via Federations.

  1. Configuring Federations

By default, when a remote user @user:remote_matrix_server wants to communicate with you at @user:your_matrix_server_name, requests will be sent to your server with port 8448. But as we have configured the traffic to use SSL, we must advertise this to other servers. This is called Delegation.

There are 2 methods to configure delegation, use only one of them:

.well-known delegation which consists putting a file names .well-known in your website root-folder with following content

{
    "m.server": "your_matrix_server_name:443"
}

Unfortunately, this method doesn’t work if you create a Reverse-Proxy rule for your Matrix server via the Synology Application Portal GUI. The solution is to configure the rule manually via a customized NGINX file.

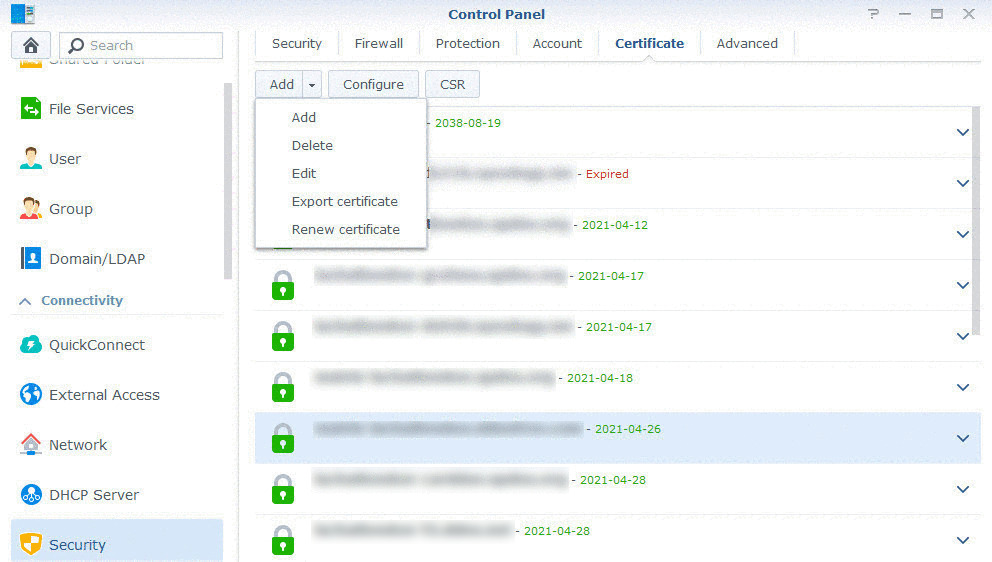
  1. Export the SSL certificate created earlier: in Control panel / Security / Certificate tab, select your certificate, click on Export and save in a folder we are calling path_to_your_SSL_certificate.

  1. Unzip the content in the same folder. You should have 3 files:
    • cert.pem
    • chain.pem
    • privkey.pem
  1. delete the Reverse Proxy rule you have defined at Step 5
  2. open a terminal, ssh to your Synology and get root privilege with “sudo su -“
cd /usr/local/etc/nginx/sites-enabled
  1. create a file named with your matrix server name “your_matrix_server_name” and copy following contents replacing the highlighted information with yours
server {
    listen 443 ssl;
    listen [::]:443 ssl;

    server_name your_matrix_server_name;

    ssl_certificate /path_to_your_SSL_certificate/fullchain.pem;
    ssl_certificate_key /path_to_SSL_domain_certificate/privkey.pem;

    location ~* ^(\/_matrix|\/_synapse|\/_synapse\/admin|\/client) {
	proxy_connect_timeout 60;
        proxy_read_timeout 60;
        proxy_send_timeout 60;
        proxy_intercept_errors off;
        proxy_http_version 1.1;
        proxy_set_header        Host            $http_host;
        proxy_set_header        X-Real-IP            $remote_addr;
        proxy_set_header        X-Forwarded-For            $proxy_add_x_forwarded_for;
        proxy_set_header        X-Forwarded-Proto            $scheme;
        proxy_pass http://localhost:18008;
    }

    location /.well-known/matrix/server {
    	default_type application/json;
    	return 200 '{ "m.server": "your_matrix_server_name:443" }';
        add_header Content-Type application/json;
        add_header Access-Control-Allow-Origin *;
    }

    error_page 403 404 500 502 503 504 @error_page;
    location @error_page {
        root /usr/syno/share/nginx;
        rewrite (.*) /error.html break;
        allow all;
    }
}
  1. test the configuration:
nginx -T > /tmp/nginx.conf
  1. if no error is returned, apply the configuration
nginx -s reload

Note 1: The above manually created Reverse Proxy rule doesn’t appear in the Synology Application Portal GUI

Note 2: as per Let’s Encrypt rule, the Synology automatically renews the SSL Certificate every 90 days. Make sure to export the new keys to your path_to_your_SSL_certificate folder

The second method, SRV DNS Record delegation, uses the so called DNS resources identifying how to reach a specific resource. So using DDNS service, add in the DNS record SRV entry with following parameters:

  • Prefix: _matrix._tcp
  • Service: SRV
  • Port: 443
  • Target: your_matrix_server_name

Once configured and propagated, you can test your federation at https://federationtester.matrix.org/

Now you should be able to communicate with users configured on other homeservers.

Enjoy !

Bridges

Matrix supports bridges to 3rd Party services such as Signal, WhatsApp, XMPP, … Here is the tutorial for Bridge to WhatsApp.

What’s next

Synapse server also natively supports 1:1 audio and video call but only works if traffic is local ie remains in your LAN or in any network where there is no NAT… Useless, isn’t it? A TURN server (coTurn) is required for VoIP traffic to enable 1:1 site-to-site calls over Internet. A further step is adding a Jitsi server that allows audio and video group calls.

Still need to work on some of these extensions to the base service.

Book your Ski Holidays at Les Terrasses de la Bergerie